To combine videos, most Mac users’ first choice is iMovie and the second is Final Cut Pro. These two tools are only compatible with Mac computers. Because people are more familiar with iMovie than Final Cut Pro, here we only introduce steps to merge clips with Final Cut Pro as well as its alternative (Joyoshare Video Joiner).
Part 1. Final Cut Pro
Part 2. Alternative: Joyoshare Video Joiner
Part 1. Join Clips in Final Cut Pro
Final Cut Pro is a powerful video editor to combine video clips. As other video editing software, Final Cut Pro supports to apply effects, trim, rotate, flip and crop videos. It has high compatibility with video formats, including DV, HDV, 2K, 4K, 5K, and 8K. Besides, Final Cut Pro has a unique function, which is to edit video in 360°.
Step 1. Import clips to Final Cut Pro
After launching Final Cut Pro on your computer, click the File button on the top bar > select Import > pick Media to add video files to Final Cut Pro. Next, drag it to the timeline by Mouse. Repeat the operations to import other clips by one by one.
Step 2. Edit clips (optional)
You can also skip this step to directly join clips. If not, you can use different functions to make your video perfect, like removing some ads, adding a unique effect or inserting some transitions.
Step 3. Begin to merge clips
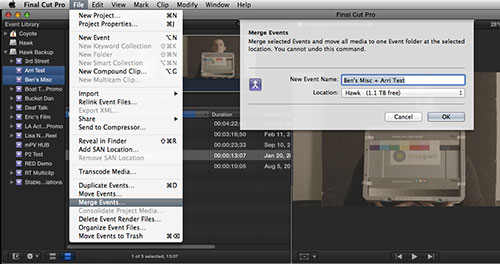
Here we press on the File button on the menu again. There you will see the option “Merge Events”. Then you can customize the name of the completed clips and the destination of the output video. Finally, touch the OK button to join the video files.
Note: If you are a beginner or want to find a more intuitive interface, then you can try its best alternative: Joyoshare Video Joiner. Compared with Final Cut Pro, Joyoshare are more popular in that it can be used by both Windows and Mac users. Now follow me to merge clips by Joyoshare Video Joiner.
Part 2. Combine Video Clips via Joyoshare Video Joiner
Joyoshare Video Joiner is another video editor to join clips on Mac computers. You can not only combine media files with the same format, but also can merge videos or audios in a great variety of formats, such as joining MP4 and AVI files. And it can combine 4K videos in a lossless way. Different from other video mergers, Joyoshare provides two modes: High-Speed mode and Encoding mode. If you want to merge video files at 60X faster speed, try the former. If you want to edit clips, like adding background music to video files, the latter offers you more options.
Why Joyoshare outstands:
Compatible with both Windows and Mac
Offer two merging modes
Combine clips fast and lossless
Suitable for both beginners and professionals
Step 1. Import video clips to Joyoshare
If you are Mac users, download and install Joyoshare Video Joiner in Mac version. After running Joyoshare, drag and drop several clips to the left screen. Or you can directly move a whole folder. Then you can rename and reorder the positions of these clips.
Step 2. Choose a suitable output format
On the right bottom is the Format button. Click it to open a new window. Then you can see two modes listed. If you select the High-Speed mode, Joyoshare’s tools are limited. You only can use two functions: cutting and merging. But you can merge clips losslessly and fast. As for the Encoding mode, it allows you to use all functions of Joyoshare, like customizing the file format. For example, you can adjust videos’ codec, resolution, frame rate and bit rate. As for audio, you can change its codec, channel, sample rate and bit rate.
Step 3. Cut unpleasant sections of your clips according to your needs
After selecting an output format, come back to the main interface. Play the clip and move the yellow sliders to cut it. If you want to trim videos more accurately, keep reading Step 4.
Step 4. Edit clips as you like
Click the Edit button next to Rename. Then you will open an inbuilt editor, which you can cut clips in an accurate way. Apart from that, press the Adjust button, you can rotate video, crop area size and change the clip’s aspect ratio. You can use every function on the top menu, including adding video and audio effects and frames, embedding watermark, subtitles, background music, and so on.
Step 5. Start to merge clips
After editing clips, click to the OK button to save these changes and return to the main interface. And then touch the Convert button to export combined video clips. If you choose the High-Speed mode and skip Step 4, Joyoshare will join your clips at 60X faster speed.


No comments:
Post a Comment