How to Use Final Cut Pro to Merge Clips Step by Step


To combine videos, most Mac users’ first choice is iMovie and the second is Final Cut Pro. These two tools are only compatible with Mac computers. Because people are more familiar with iMovie than Final Cut Pro, here we only introduce steps to merge clips with Final Cut Pro as well as its alternative (Joyoshare Video Joiner).

Part 1. Final Cut Pro
Part 2. Alternative: Joyoshare Video Joiner

Part 1. Join Clips in Final Cut Pro

Final Cut Pro is a powerful video editor to combine video clips. As other video editing software, Final Cut Pro supports to apply effects, trim, rotate, flip and crop videos. It has high compatibility with video formats, including DV, HDV, 2K, 4K, 5K, and 8K. Besides, Final Cut Pro has a unique function, which is to edit video in 360°.

Step 1. Import clips to Final Cut Pro

After launching Final Cut Pro on your computer, click the File button on the top bar > select Import > pick Media to add video files to Final Cut Pro. Next, drag it to the timeline by Mouse. Repeat the operations to import other clips by one by one.
 

Step 2. Edit clips (optional)

You can also skip this step to directly join clips. If not, you can use different functions to make your video perfect, like removing some ads, adding a unique effect or inserting some transitions.


Step 3. Begin to merge clips

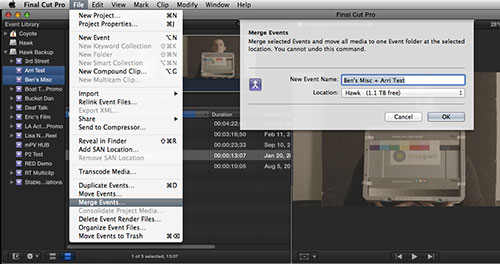
Here we press on the File button on the menu again. There you will see the option “Merge Events”. Then you can customize the name of the completed clips and the destination of the output video. Finally, touch the OK button to join the video files. 


Note: If you are a beginner or want to find a more intuitive interface, then you can try its best alternative: Joyoshare Video Joiner. Compared with Final Cut Pro, Joyoshare are more popular in that it can be used by both Windows and Mac users. Now follow me to merge clips by Joyoshare Video Joiner.

Part 2. Combine Video Clips via Joyoshare Video Joiner

Joyoshare Video Joiner is another video editor to join clips on Mac computers. You can not only combine media files with the same format, but also can merge videos or audios in a great variety of formats, such as joining MP4 and AVI files. And it can combine 4K videos in a lossless way. Different from other video mergers, Joyoshare provides two modes: High-Speed mode and Encoding mode. If you want to merge video files at 60X faster speed, try the former. If you want to edit clips, like adding background music to video files, the latter offers you more options.


Why Joyoshare outstands:
Compatible with both Windows and Mac
Offer two merging modes
Combine clips fast and lossless
Suitable for both beginners and professionals

Step 1. Import video clips to Joyoshare

If you are Mac users, download and install Joyoshare Video Joiner in Mac version.  After running Joyoshare, drag and drop several clips to the left screen. Or you can directly move a whole folder. Then you can rename and reorder the positions of these clips.


Step 2. Choose a suitable output format

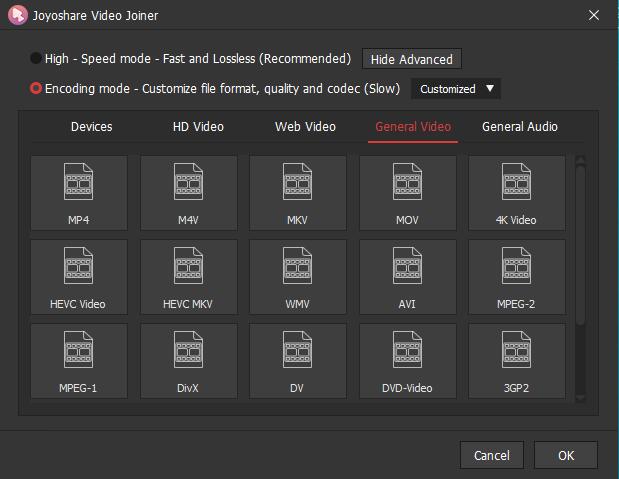
On the right bottom is the Format button. Click it to open a new window. Then you can see two modes listed. If you select the High-Speed mode, Joyoshare’s tools are limited. You only can use two functions: cutting and merging. But you can merge clips losslessly and fast. As for the Encoding mode, it allows you to use all functions of Joyoshare, like customizing the file format. For example, you can adjust videos’ codec, resolution, frame rate and bit rate. As for audio, you can change its codec, channel, sample rate and bit rate.


Step 3. Cut unpleasant sections of your clips according to your needs

After selecting an output format, come back to the main interface. Play the clip and move the yellow sliders to cut it. If you want to trim videos more accurately, keep reading Step 4.


Step 4. Edit clips as you like

Click the Edit button next to Rename. Then you will open an inbuilt editor, which you can cut clips in an accurate way. Apart from that, press the Adjust button, you can rotate video, crop area size and change the clip’s aspect ratio. You can use every function on the top menu, including adding video and audio effects and frames, embedding watermark, subtitles, background music, and so on. 


Step 5. Start to merge clips

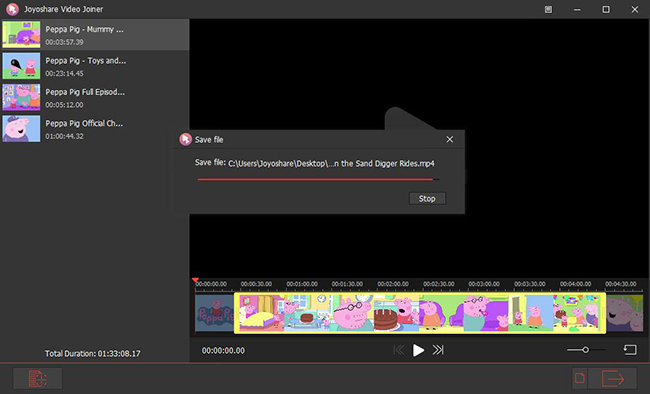
After editing clips, click to the OK button to save these changes and return to the main interface. And then touch the Convert button to export combined video clips. If you choose the High-Speed mode and skip Step 4, Joyoshare will join your clips at 60X faster speed.
 

Wonder to Combine WebM Videos? It’s Easy!

WebM is a media file format, which is applied in the HTML5 video and audio elements. It is very popular due to its high quality. Do you have cumulated some WebM videos on your computer? If so, have you ever thought to combine WebM files into a large one? Then which video editors can do that? Relax! You don’t need to ask this question in forums or some answer websites. Reading this article is enough! Here we introduce 3 WebM video joiners. Look no further!

Tool 1. Combine WebM by Joyoshare Video Joiner

Joyoshare Video Joiner is a powerful video editor to merge WebM files with no quality loss. Before combining them, you can also cut unwanted parts off WebM videos. Joyoshare embraces two modes: High-Speed mode and Encoding mode. If you just cut and join WebM videos, the former will be better, with which you can export your combined WebM at 60X faster speed. Or you want to edit your WebM files, then try the latter. What’s more, Joyoshare supports you to rotate and crop videos, adjust brightness and hue, add video effects, insert watermark and subtitles, embed background music, etc. Apart from merging, cutting and editing, you can also convert your WebM files to any other formats, including audio and video formats. If you convert videos to audios, that means you extract audio track from videos.

The reasons to choose Joyoshare:
  • Merge WebM files in a lossless way
  • Export WebM files at 60X faster speed
  • With a built-in cutter, editor and converter
  • Combine WebM videos without any skills

Steps to merge WebM files by Joyoshare: 

Step 1: Add WebM files to Joyoshare Video Joiner. You can click the Open File button or drag and drop videos to import WebM files.


Step 2: Select one merging format and the output format. Click the Format button, you can choose one mode between High-Speed mode and Encoding mode. The latter allows you to customize video and audio settings as you like, like codec.


Step 3: Cut WebM videos. After picking the output format, click the OK button to return the main interface. Here you can cut videos.


Step 4: Edit WebM files. Click the Edit button to open Joyoshare’s inbuilt editor, with which you can also cut videos. Except for that, you can edit videos if necessary, like adding background music (Click Audio > Select File). 


Step 5: Join WebM files fast. In this step, you just need to click the Convert button on the right bottom. If you choose the High-Speed mode, then Joyoshare exports WebM files at 60X faster speed.


Tool 2. Merge WebM via MiniTool Movie Maker

MiniTool Movie Maker is another video merger software I recommend to join WebM video files. Apart from its combining function, MiniTool supports speed up, slow down and reverse videos. Besides. it has an intuitive interface. A person without any skills also can use it.


Steps to combine WebM video files with MiniTool Movie Maker:

Step 1: Click the Import Media Files to add your WebM videos to MiniTool;
Step 2: Drag the WebM files to Storyboard from the Media Library;
Step 3: Add some transition effects (optional);
Step 4: Click the Export button to merge WebM videos.

Tool 3. Join WebM with Aconvert

Aconvert is an online video editing tool. As its name shows, it can convert videos. Apart from that, Aconvert supports to combine WebM files. Also, you can cut, rotate and crop videos according to your needs. Different from other tools, Aconvert only supports uploading video files.


Steps to join WebM videos via Aconvert:

Step 1: Click the Choose File button to upload several WebM videos from your computer. Besides, you can select WebM files from Online File, Google Drive and Dropbox;
Step 2: Press on the Submit button on the right bottom;
Step 3: Click the Download button to download the merged WebM files.


Conclusion and Suggestion:

In my opinion, the 3 video merger software above have their own features. Aconvert limits its uploaded videos less than 1 GB and it can only merge videos in the same format, size and frame rate, etc. If you just want to combine WebM files into one, Aconvert is the best choice. 

If you want to merge different formats of videos, Joyoshare is highly recommended. Of course, if you just merge WebM, Joyoshare is also better than Aconvert. The reason is that Joyoshare can combine videos in the same format losslessly and quickly (60X faster merging speed). Besides, it is also a professional video editor, cutter, converter and extractor.  

Apart from joining WebM videos, if you want to change its playing speed, try MiniTool Movie Maker

Do you have decided to which tool to use? If not, why not leave a comment to tell us your better choice?

[Tutorial] Combine GIFs into a Short Video in 2 Easy Ways


Nowadays, GIF animated pictures often appear on chatting windows, social sharing platforms, etc. GIF is more energetic than static pictures, which can express more meanings. Then have you ever thought to combine GIFs into a short video? To save your time, you can directly get the answer to GIF joiners in this article. Let's move on!


Part 1. How to Combine GIFs via Joyoshare Video Joiner

Are you seeking for a GIF combining program to make multiple animated GIFs merged into a whole? Nicely, here such a program called Joyoshare Video Joiner is technically developed to join variegated GIFs, live photos, videos, and audios with no quality loss. Coming with the strong compatibility, importing various formats of files as well as converting them to a large variety of media formats is allowed with Joyoshare Video Joiner.

Not only that, but it also supports previewing, cutting, and editing your animated GIFs. Or rather, you could precisely cut the unwanted section from these GIFs and edit them as you like. For instance, you may trim them, adjust aspect ratio, apply visual effects, or add watermark and subtitles. Although Joyoshare Video Joiner supplies two merging modes for you, for best results, you ought to choose the encoding mode to combine these GIFs. Well, next come the main features of it and the specific steps to operate it so that you can acquire more complete knowledge about this GIF combiner.

Key Features of Joyoshare Video Joiner:
  • Can merge multiple GIFs quickly and safely
  • Customize files formats, quality, and codes
  • Support to rename, preview, cut, and edit files
  • Allow to rearrange these files as you demand

Step 1. Drag GIFs into Joyoshare Video Joiner
Please download and install Joyoshare Video Joiner on your computer first. Next, you need to drag your GIFs to the program or add them with the "Open File" icon located in the bottom left corner.


Step 2. Select encoding mode and output format
In this step, you ought to tap on "Format" to select a merging mode and output format. As described previously, to better merge GIFs, you have to choose the encoding mode, which supports to customize codec, resolution, frame, and bit rate of the selected output format. Then, just click "OK" to go back to the main interface.


Step 3. Cut GIFs
At this time, if needful, you are able to rename, preview, and rearrange these GIFs or remove undesired sections from them.


Step 4. Edit GIFs
Merging GIFs with the encoding mode gives you the ability to edit them. According to actual demands, you are permitted to trim and rotate them, add visual effects and subtitles, etc.


Step 5. Start combining GIFs

Lastly, you only touch "Convert" to let Joyoshare GIF combiner merge these GIFs into one. After that, you can watch it in your local file.


Part 2. How to Combine GIFs via EZGIF Maker

EZGIF Maker is a free GIF combiner that focuses on easily merging multiple GIFs online. It can not only join GIFs together one after another but also make images in other formats like GIF, PNG, JPG, and so forth to an animated GIF. Furthermore, with this GIF maker, you are capable of cropping, rotating, optimizing GIFs, adding effects and texts, changing speed, etc. However, what needs to be noted is that these GIFs to be merged should have the same sizes and frame rates. Incidentally, the output format you can select in this program is limited. Even so, it is, in principle, as worthy as Joyoshare Video Joiner in terms of merging GIFs. The following are the instructions to guide you to do it with EZGIF Maker.


Step 1: Get started by visiting the official website. Then choose GIFs you want to merge from your local files under "Select images". After selecting, please tap on "Update and make a GIF" to go to the next step;

Step 2: In this section, you will see every frame of these GIFs and you can change order. If these GIFs are not equally sized, you will be prompted to resize them to match the smallest one. Once done, hit on "Make a GIF";

Step 3: Now, if necessary, you are able to edit the animated GIF, like cropping and cutting it, applying effects, adjusting speed and so on;

Step 4: When everything is ready, you need to touch "Convert" and select a format as the output format.


The Source Page:

The Top 5 Free Apps to Merge or Split Video Files

Editing videos can be surprisingly complex. Using a serious tool like Adobe Premiere Pro, it could take days to comfortably cut your first video into smaller clips, or merge videos together into a single larger clip.

What are you to do when you don’t have that kind of time? What if you just want to merge videos together one time and don’t want to install a full-blown video editor like Final Cut X or HitFilm Express?

Don’t worry, you have options! There are many free tools for splitting and merging video files—the tricky part is finding the ones worth using. Learn how to merge videos together (or split videos apart) using these best apps for merging and splitting videos.

1. MP4Tools


MP4Tools is an open-source project that consists of two utilities, making it a free video merger and free video splitter in one.

MP4Splitter is for splitting an MP4 video file into multiple pieces:


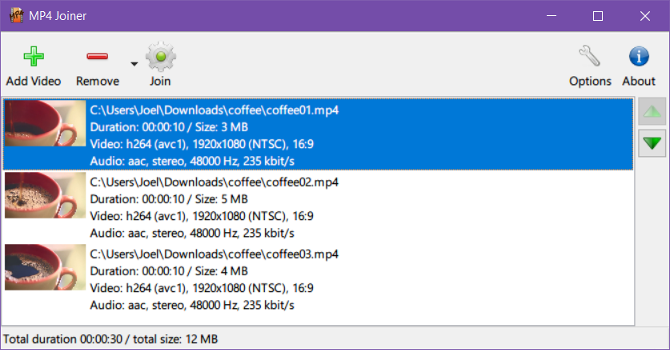
MP4Joiner is for merging MP4 video files together:


No other video types are supported, but seeing as how MP4 is the most popular video format, that’s not a huge problem.

Actually, it’s a benefit! MP4Tools can split and merge MP4 videos without re-encoding. Re-encoding takes time and often results in a loss of quality, which is why MP4Tools can do instant cutting and joining at source quality. This is why it’s our favorite free video merger app. However, you can force re-encoding if you’d like.

Splitting is as easy as loading a video file, adding “split points,” then clicking Start splitting. Merging is even easier: add the individual video files, then click Join.

2. Machete Video Editor


As far as lightweight video merger and editor apps are concerned, Machete Video Editor is one of the best. As long as you output videos with the same settings as your source videos, it will not re-encode.

The downside to the Lite version of Machete is that it only works with AVI and WMV formats. To unlock FLV, MP4, MKV, MOV, and several additional audio formats, you’ll need to purchase the full version. This is the only limitation of the Lite version.


To split a video, click Play > Jump to time… and navigate to a starting timestamp, then click the Set the beginning of a selection button. Navigate to an ending timestamp and click Set the end of a selection. Then click Save the selection as… to export the clip.

To merge videos, load the first clip (it can be any, doesn’t have to be the first in order). Use Play > Jump to time… to navigate to where you want to insert the next clip, then click Edit > Insert a file at the current position… Repeat for all clips, then File > Save As… to finish.

3. Format Factory


I hesitate to recommend Format Factory because it requires over 150 MB to install—a hefty amount of space if all you want to do is split and merge video clips. But if you also need to convert between formats and/or rip from CDs and DVDs, then it may be worth your while.


To split a video, click the output format you want in the sidebar, then click Add File and load the video. Click Option, set the Start Time and End Time to wherever you want the split, then click OK. Lastly, click Start to begin the splitting task.


To merge videos, go to Utilities > Video Joiner in the sidebar. Set the proper Output Setting, then click Add File to load all of the individual clips. Lastly, once everything is ordered properly, click OK and then Start to begin the merging task.

Note: You may see an “Unsafe Website!” warning for Format Factory claiming that it distributes spyware/malware. As long as you uncheck the bundleware during installation, it’s fine. That said, use at your own risk!

4. Avidemux


While Avidemux is technically a video editor, it has nowhere near the same complexity as a professional video workstation. It’s simple enough that you only have to click a few buttons to do what you want, especially if you only need to split and merge videos.

Avidemux supports AVI, FLV, MP4, MPG, and MKV formats, which covers about 99 percent of all modern videos. Furthermore, Avidemux won’t re-encode if your output settings are the exact same as the input, thus saving time and preserving video quality.


To split a video, load it and click Time at the bottom, set the starting timestamp of the split, then click the Set start marker button. Next, navigate to the ending timestamp of the split, then click Set end marker. Lastly, click File > Save to save everything between markers as a clip.

To join videos, load the first clip with File > Open, then load subsequent clips with File > Append. You must do it in the order you want them merged! Save the combined video with File > Save.

5. Freemake Video Converter


Freemake Video Converter supports over 500 video and audio formats and is easy to use, but the free version adds a watermark. For $9 per year (or $19 lifetime payment), the watermarking is removed and video conversions are even faster. Unfortunately, splitting and merging always re-encodes.


To split a video, load it with the +Video button, then click to edit. Use the playback timeline and the Start Selection and Selection End buttons (under the Cutting section) to select a timeframe. When finished, click OK and then one of the output buttons at the bottom to export.


To merge videos, add as many clips as you want with +Video, and then enable the Join files toggle at the top right. Drag and drop to sequence the clips, then click one of the output buttons at the bottom to export.

Split and Combine Video Clips With Ease


Going forward, you should also learn how to reduce video file sizes without sacrificing quality, which comes in handy when doing all kinds of video editing. Also, don’t miss out on the nuances of video codecs, containers, and compression!

Want to edit videos on the go? Be sure to check out these free video editing apps for iPhone and iPad as well as these free video editing apps for Android.

The Source of This Article:


More Recommendation:


Joyoshare Video Joiner is another software to merge or split video files without quality loss. It can merge videos/audios at 60X faster speed. Except for that, Joyoshare also has more functions, like video editing, cutting, converting. Also, under the help of it, you can extract audios from videos. Joyoshare has high compatibility, so it supports multiple video and audio formats, like MP4, WMV, AVI, MP3, FLAC, OGG, etc.


[Update] Top 3 Ways to Combine Voice Memos [100% Useful]

Most Apple users love Voice Memo, an inbuilt app iOS products. The reason is that Voice Memo is a great audio recorder. It is very convenient in many situations, like family moments, medical lectures, and so on. You can record every happy voice or some useful knowledge. With time going one, there are cumulative voice files. Some of them may belong to the same type. Then why not combine them together? In that case, some users search for voice memo joiners on the Internet. If you continue to read this article, then you don't need to try every merging tool showing on Google results. Here you can know the features of three audio joiners and then make your own choice. 

Part 1. How to Combine Voice Memos with Hokusai Audio Editor


Hokusai Audio Editor is a multitrack audio editor running on iOS devices. Developed with a beautiful clutter-free interface, it has the ability to easily record, cut, copy, paste, polish (like adding a suite of filters or special effects), and mix audio tracks. Powerfully, the audio editor can edit many audio files side-by-side and export them to MP4 format.

Even, transferring your voice memos to a computer or another application on the iPhone and uploading them to cloud service is nothing difficult for it. Even if you are demanding in terms of combining audio files, it could nicely satisfy you. The below will guide you to do it.


Step 1: The first thing to do is saving your voice memos to the Files app with the "Share" button in the Voice Memo app. Then download and install Hokusai Audio Editor on your iPhone from App Store;

Step 2: After that, tap on "Import" to input your voice memos from the Files app to the software. Note that the program does not support importing a bunch of files. You need to add them one by one;

Step 3: Now, playback all the loaded audio files. If there is something undesired, you can cut it before merging them;

Step 4: Once done, click on a spanner icon in the upper right corner, and then in a drop-down menu, please choose "Share Audio". In this way, your voice memos will be combined with the Files app.

Part 2. How to Combine Voice Memos with Joyoshare Audio Joiner


Joyoshare Audio Joiner, one of the most practical and excellent programs, is expressly designed to join any audio recordings or video clips without compromising on quality. With it, not only can you merge files but also easily cut and edit them on your preferences. To be geared to the needs of users of all ages, this video joiner is much user-friendly. Regardless of a professional or amateur, you are able to operate it without any trouble.

More than that, wide compatibility is one of its remarkable characteristics. No matter what format your voice memos are, Joyoshare Audio Joiner can assist you in merging them with no difficulty. To offer more flexibility and selectivity, it is equipped with two merging modes for both lossless join and audio customization. Remember to transfer voice memos to your computer before merging them on desktop.

Key Features of Joyoshare Audio Joiner:
  • Support audio conversion and audio editing
  • Provide high-speed mode and encoding mode
  • Accept files in various formats like MP3, MP4, MOV, MKV, etc
  • Best audio joiner to combine voice memos losslessly at 60X speed

Step 1: Add voice memos into Joyoshare Audio Joiner
According to your situation, download and install the proper version (Mac or Windows) of Joyoshare Audio Joiner on your computer. Next, please open it and tap on "Open File" to browse your local files to choose voice memos. More conveniently, you can directly drop and drag them to a certain position.


Step 2: Select joining mode and output format
Simply press on the "Format" button to choose High-Speed mode or encoding mode to combine your voice memos. Before choosing, please know that the former is to merge files of the same format without quality loss while the latter allows you to customize files besides joining. Then pick a format for the new memo.


Friendly reminder: After determining the output format under the encoding mode, you are permitted to click the gear icon to set up codec, channel, sample rate, bit rate of the merged audio file.

Step 3: Remove something needless from voice memos
Once selected merging mode and output format, click on "OK" to go back. In the first interface, preview your voice memos one by one. For unwanted sections, you are able to delete them by moving the yellow timeline. Also, rename and rearrange every file as you will if needful.


Step 4: Edit voice memos (optional step)
This step is just for those who choose to combine voice memos with the encoding mode. For them, trimming files, applying sound effects, adjusting audio volume can be done at this time.


Step 5: Combine voice memos
Now, just lightly hit on "Convert" to start the process. A moment later, your voice memos are merged into a seamless audio file and saved in a "converted" file of the local file folder.


Part 3. How to Combine Voice Memos with Online Audio Joiner


In consideration of the situation where some might prefer to combine voice memos without downloading anything, online Audio Joiner is recommended. It supports joining audio files of various formats quickly and gives the ability to convert them to MP3, M4A, WAV, FLAC, etc. For your convenience, below concentrates on how to make use of it to combine voice memos at every step.


Step 1: Type this URL: https://audio-joiner.com/ in the browser and get into the main interface of this online joiner;

Step 2: Click "Add tracks" to import voice memos to be combined or use drag-and-drop function to add files;

Step 3: Touch the "Play" button to preview them one after the other. To cut something undesired off them, move the blue slider or set "Start" time as well as "End" time;

Step 4: If required, tap on the up arrow or down arrow button to rearrange the sequence of each voice memo file. Then, specify an output format and press on "Join" to combine your voice memos.

Part 4. Comparison


By the introduction above, have you decided which audio merger to use? If not, read the table below. You will know exactly their advantages and disadvantages when combining voice memos.

 Method Hokusai Audio Editor Joyoshare Audio Joiner Online Audio Joiner
 Applicability iOS Devices Windows and Mac Online
 Easy to Use Yes Yes Yes
 Target User Apple Users Preferring Merging on Mobiles Beginners and Professionals Beginners
 Mode to Merge Single Two Modes Single
 Editing Options Yes Yes No
 Quality Loss Slight Loss No No
 Supported Format Just Formats iOS Is Compatible Various General/Device-compatible Formats MP3, M4A, WAV, FLAC
 Speed of Merging Decided by iDevice Performance 60X Faster Speed Depend on the Network Condition
 Price Free $29.95/Lifetime Free

Hot Article